Learning to strike well is an essential part of becoming a proficient ringer. Traditionally the only way to get feedback, for a band or an individual, on how good the striking is, and how to improve it relied on an experienced ringer listening and commenting. Many bands don't have anyone able to do that, and even for those that do it isn't ideal.
Being able to pick out features of the striking doesn't mean that you can remember all the detail to the end of the touch. and trying to make comparisons from week to week is very difficult. Human judgement is subjective.
In addition, people are not always willing to accept criticism from other ringers, whose judgement they might not trust, and with whom they might have personal issues. Likewise a ringer commenting on the striking might be reluctant to criticise someone with whom he or she feels uncomfortable.
A strikeometer can overcome those limitations by providing an objective analysis of the striking in a touch of any length, and it can do so consistently enough to compare ringing on different occasions. Currently (2026) two strikeometers are available for installation in towers, Hawkear and Cirel, and you can upload recordings made in the tower to an online analysis service, BReNDA, see links.. This page explains how a strikeometer works along with practical advice on how to acquire, install and use one.
A strikeometer takes in a signal every time a bell strikes and uses the signals to derive an 'average' ideal rhythm, the series of times when each bell should have struck, and then assesses the extent to which the actual time of each blow deviates from the ideal.
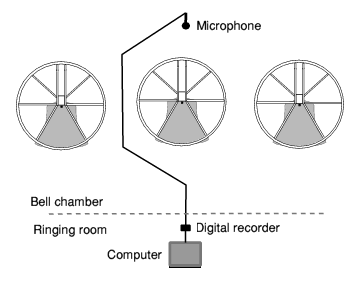
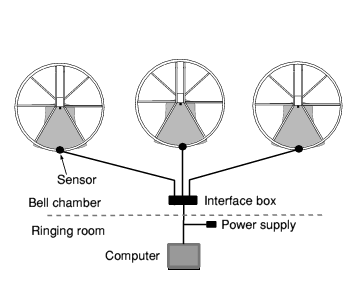
Hawkear extracts the strike times from a digital recording of the sound, taken from a high quality microphone above the bells. Cirel derives the strike times from sensors on each bell either a sensor on the bell itself that detects the clapper impact directly or a sensor on the wheel that detects the bell's position where it strikes (cases nalyse the signals. In both cases The software to runs on a Windows PC or laptop.
BReNDA doesn't require a fixed installation and can accept a normal recording of the ringing made in the ringing room, which is uploaded to a dedicated website for analysis.
Installation of the two systems is quite different.
Installing Hawkear – The best place for the microphone is as high as possible above the bells in the bell chamber. If that isn't possible it might be possible to use the stair well on the way up to the bells. The location is critical and you will need some trial recordings to determine the best position, see below. The microphone needs to be securely supported and the cable down to the ringing room needs routing where it will not be disturbed or damaged by people moving around the bell chamber doing normal maintenance activities. There is more guidance, and advice on the choice of microphone available from here .
You will need a suitable location in the ringing room for the computer and recorder, with access to the mains and to the cable from the microphone.
Installing Cirel – If you already have a simulator(s) with sensors on all bells then installation is little more than loading the software. If you don't already have sensors on all bells then you will need to fit them. The process is the same as if you were installing a simulator, so see the guidance here.
If you want to use impact sensors with Cirel, see the instructions here .
Setup is also quite different for Hawkear and Cirel.
Setting up Hawkear – First you need to ensure that you can obtain a good recording of the bells ringing, with the sounds of different bells balanced, and with no distortion. That relies on the location and type of microphone and the setting on the recorder. Then you need to train the software to recognise what each bell sounds like, so it can identify them separately when analysing the sound. You can obtain advice from here .
Setting up Cirel – Impact sensors need minimal setup since they directly detect the clapper strike.
Wheel sensors need calibrating to ensure that the signal is generated at the correct time. The sensor triggers when the bell passes though the mouth down position and the system then delays the signal by a set amount to be when the bell would strike. The exact delay is less important when using the sensors with a simulator because what the ringers hear is generated from the sensor signals. But to measure the striking with the bells open the delay values for each bell need to match the actual strike times of the clappers. With Bagley sensors Abel (or similar software) transmits the delay settings to the interface box, which then remembers them, but other types of sensor might do it differently.
To calibrate the delays, ring each bell on its own with Abel (or similar) so you hear both the sound from Abel and the sound of the clapper. You will need to turn up the volume on Abel. Ring a few whole pulls and listen carefully to see if one sound comes before the other. If it does then adjust the delay, apply the setting and then repeat the process. When you can't hear one sound before the other then move on to the next bell.
If the real sound is a bit early on one stroke and a bit late on the other with any of your bells then they are odd-struck. Since the system can't apply a different delay at each stroke the only way to align the sounds is to move the reflector on the wheel (assuming wheel mounted sensors), which is more fiddly.
To reduce the amount of trial and error check the correct delays for handstroke and backstroke (by adjusting for each separately) and then move the reflector by a small amount, say an inch and measure the delays again. If the delays are still the same way round then you need to go further, and you can work out how much further by how much you have already achieved. Suppose the difference was 6 and you have reduced it to 2 then you need to move the reflector half as far again. If the delays are the opposite way round, say from handstroke being 4 bigger to backstroke being 2 bigger (ie a net change of 6) then you need to move the reflector about a third of the way back to where it was. If the correct handstroke delay is bigger than the correct backstroke delay then move the reflector slightly towards the garter hole (when the bell is down).
Setting up for BReNDA – Although there is no equipment to install it would be sensible to check that the recording device and the location where you record, give recordings of a suitable quality to generate reliable results. Towers where the bells are difficult (for humans) to hear are likely to be more difficult.
You can use a strikeometer in different ways:
If you have used a simulator to help your pupil learn to ring rhythmically then he/she will already be familiar with looking at a graph, score or blue line to see how well he/she did. If not, then you will need to introduce this element, explain what the various displays mean and how they relate to various aspects of the ringing, You will also need to emphasise that even good ringing isn't perfect and a degree of 'error' is inevitable, so the aim is not to 'see how good/bad' the ringing was but to understand what was happening and how to improve it. This is especially important since the pupil is likely to be ringing with more experienced ringers, and therefore almost always likely to produce 'worse' results than everyone else. You may find the description of common problems in the simulator section helpful.
If you want to focus on striking, rather than have it as just another dimension of a general practice, you may consider running s session with it as the primary objective. It is best to have a small number of 'students' and probably a few experienced helpers, and to run it like a course. Ring things that are well within the participants' capability so they can focus on being aware of their striking and trying to strike well. After discussing the results of one piece, consider ringing the same thing again with the same people on the same bells. Expect to spend a greater fraction of the time looking at results and discussing them than you would normally spend between touches in a general practice.
You can read an article about a striking session . The 'students' there were relatively inexperienced but you can run such a session with more advanced ringers providing they are at a similar level.
For those who don't want to spend a whole session on striking you can use a strikeometer routinely during practices, service ringing and quarters peals to raise awareness of the quality of the striking. Set it to record all ringing automatically and display summary results at the end of each touch. Let it just run in the background until the band has got used to it. At first a few who want to look at their performance will do so while others do not. Over a period of weeks more people are likely to take an interest.
With some touches the display won't tell you anything useful anyway since you don't need a machine to tell you that a touch was a mess. The numbers won't mean much in those situations anyway. The strikeometer is more useful where there aren't lots of mistakes, there is some semblance of a rhytm and the bells are mostly in the right order.
Looking at the results overall gives an indication of the band's performance can answer questions like: How predictable is our striking? Is our service ringing better than our practice ringing? Was our service touch the best touch? Was this month's quarter peal better than last months?
Individual ringers looking at their results will get a feel for how well they did compared to the average, but more particularly they can see for example: Do I tend to be late or too early? Are my handstrokes worse or better than my backstrokes? Do I ring better on some bells than others?
Information at that level can be available after every touch, and taking note of it will not disrupt the flow of ringing. But there may be some touches where you could gain more by taking a little longer to look at more detail, for example by highlighting the blue line of individual bells and looking for any pattern. That is particularly likely to be useful for example where a ringer is having specific problems such as executing dodges, leading or turning round properly at the back.
When practising for a competition a strikeometer can give you an objective amd quantitative view of how well you rang the touch, which is a useful supplement to your subjective judgement. It can also tell you how much you have or haven't improved between attempts, and it might help you to identify some aspect that you could work to improve.
Return to Training aids or Education