The Tower Handbook
11.3: Teaching handling and bell control
This is one of the most critical aspects of ringing teaching, and so this is a long section. There are whole books on this topic and we don't attempt to reproduce them here. We have tried to cover the main approaches and to encourage you to think about different aspects of the process. We have tried to answer some of the questions that tend to get left out when people pass on their 'how to do it' versions of teaching.
a: Why is bell handling important?
When you teach someone to handle a bell you are laying the ground work on which all their subsequent teaching and learning will be built. If you lay poor foundations, everything which comes later will suffer.
Good bell handling means good co-ordination between many small actions. The co-ordination works because many of the actions themselves are semi automatic, only partly subject to conscious control. If you teach badly, or if because of laziness you allow your students to develop poor handling habits, these too will become ingrained and beyond easy reach of conscious attempts to change them.
Time after time, ringers struggle for ages with the later stages of bell ringing when their real problem is that they never mastered their own handling. Small wonder they cannot make the bell do what they want.
b: How is bell control different from bell handling?
Many people use the terms interchangeably, but we have included this question to make an important distinction. We can best do this by analogy with cycling.
- Bell handling
is the initial stage concerned with being able to ring a bell unsupervised in safety and to exert some control, albeit imperfect, over the speed and timing. This is equivalent to riding a bike without falling off and being able to get from one end of an empty street to the other.
- Bell control
is what follows (and may take a long time to acquire). It means being able to make the bell do what is needed, accurately, and when intended. This is equivalent to the level of cycling proficiency needed to be allowed out in traffic. In ringing and in cycling, the more demanding the task, the better developed control is needed to undertake it.
c: How much should we explain before starting?
Tell them what it is about. Ringing makes far more sense if you have seen what is on the other end of the rope, and you know what the bell, rope, etc are doing. If possible, use a model bell as well as the real thing. The model is best for explaining how things work. You can turn the bell over by hand, move it in slow motion and look at it from any angle. But models are only models and to get the scale of a real bell you must go and look at it. Show the real equivalents of the things you pointed out on the model. If you are fit and agile it is more convincing to point out sliders, pulleys, etc from the bell pit (with the bell down of course!).
If possible have someone else ring a bell being for a few strokes for your trainee to watch. (See section 3.1x for safety precautions and make sure everyone is in a safe position and able to cover their ears if the sound alarms them). Show the bell being lifted from the stay towards the balance before it is pulled off. Show it being stood at both strokes. Point out the clapper striking opposite sides. Show it being rung quickly and slowly.
d: What about the safety angle?
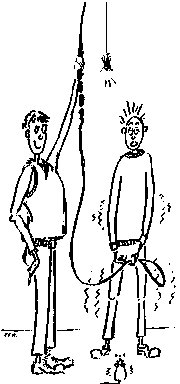 Safety is important (but don't overdo it). Instil respect not fear – see picture. When you teach an inexperienced person, you are completely responsible for his or her safety. Instruct your pupil in potential hazards and in safety procedures. Always monitor your pupil's behaviour to ensure that it is safe.
With proper behaviour the risks of ringing are small so don't instil fear, just a proper respect for the bell.
- Explain what could happen and why.
- Explain how to prevent it happening.
- Explain what to do to be safe if something goes wrong.
- Emphasise that ringing is safe if done properly.
Your pupil will understand the safety messages more easily if you relate them to your explanation of how the bell works, especially when viewing the bell installation.
Always explain the emergency drill before you start. At the next few sessions, ask your pupil to repeat it to you. Make these three points:
- 'If the rope pulls upwards out of your hand,
Let go of it. (Do not let yourself be lifted up.)'
- 'If I tell you to let go,
Let go immediately.'
- 'If the rope starts to thrash about,
Leave the sally alone. (You may injure yourself if it jerks upwards.)
Keep hold of the tail end. (It is more dangerous flying around loose.)
Stand back slightly, (to avoid it falling on top of you).
Shorten your tail end. (Take in the slack so you can 'feel' the bell.)'
Explain that after this last action, the pupil and the bell would be in a safe, stable condition. He or she could either get the bell back up, let it ring down taking in rope as needed or wait to be rescued. Reassuring your pupil that he or she can regain control, even if things go wrong, will help build confidence.
Some teachers would not include the last one because they would always intervene. But the best time for emergency instructions is at the beginning. You may forget it later. In any case, the ability to recover from the bell dropping slightly is very important [109]. It is only really dangerous if allowed to progress uncorrected. The point of this drill is to enable the student to learn to take suitable action quickly.
e: Does it matter how one stands to ring?
To ring naturally, the body must be in balance. In practice, this means having the feet a little apart. Too close is unstable [110] and too wide makes for a very rigid posture. Having one foot a bit in front of the other helps maintain fore and aft balance as well. Ask your students to stand comfortably and they will probably do it like this. If not, help them to find a comfortable balance with the weight spread between both feet. Standing with the weight on one leg leads to a very stiff style that makes it harder to respond the needs of the bell [111].
f: Should we teach rope handling separately?
You may think this is a daft question, but it is not (unless you know the answer). Handling the rope properly involves getting a lot of things right. It is not surprising that many learners find it hard with the rope flying around.
Some aspects of rope handling can be practised on their own with a dead rope (a stationary one, on a bell that is down). You will find this makes it easier to cure problems. There are (at least) four very useful exercises. The first three all have a common feature. They start with a slow movement that allows you and the student to see exactly what is happening and get the actions correct. They are then repeated more and more quickly to help make the action more automatic. The ideal is to be able to do each correctly while not looking and doing it faster than it would be done in normal ringing. In each case, start by demonstrating what you want your pupil to do, including getting faster [112].
- Vertical hand movement
The 'hand-ring exercise' helps develop vertical movement of the hands. This avoids the tendency many ringers have of flailing their arms forward in an arc and as a result throwing the rope forward and/or pulling it back. Tell your student to form a ring (with thumb and forefingers of both hands touching at the tips [113]) around a vertical hanging rope, and then without disturbing the hanging rope [114] move the hands up and down from full stretch upwards to arms fully down. Do it slowly at first, then getting faster. Tell the student to focus on the vertical movement of the hands, not on the arms and elbows, which will fit in correctly if they are relaxed.
- Rope grip and transfer
This helps develop a smooth, even transfer from backstroke to handstroke grip (and a chance to iron out other problems, eg hands apart on the rope).. Your student holds the tail end with both hands, pointing downwards, moves the hands up towards the sally, opens the fingers of both hands while keeping the wrists near together (with the tail end in its correct place) and then closes all fingers round the sally. He or she then reverses this, returning both hands to grip the tail end. Emphasise the smoothness of the whole movement. Make sure the hands only move a little from the vertical to clear the sally when holding the tail end. When you are happy the actions are right, tell your student to repeat them faster and faster to help make the actions automatic.
- Coil handling
Your student goes through the process of working rope into the hands until there is enough for a coil, uses a little of this to make the coil, and so on until all the spare rope is in coils in the hand. He or she then reverses the process, letting out small amounts of rope, shedding coils and absorbing the remains of the ones shed into the next one. Make sure the basic action is OK, then have the student repeat it faster and faster, eventually doing it without looking.
- Rope tension exercise
This allows you to demonstrate how much force should be on the rope and to test whether the student is adjusting to achieve it, even when the rope is moving. Stand on a big box or a chair holding a dead rope end high enough for the student to reach up and hold it. With the rope static, tell the student to decrease (or increase [115]) the tension to a suitable level. Then tell him or her to maintain the same level of tension as you move the rope up and down. Start with slow even movements, gradually making them faster and changing speed.
Use these exercises before you try doing it with the live bell, and then go back for revision whenever you see problems developing.
g: What is the 'four stroke cycle'?
 Conventionally we talk about two strokes, hand and back. This relates naturally to the way the bell speaks, but in terms of controlling it, it is more helpful to think of a four stroke cycle as shown in the diagram. The arrows show the sequence, and the dots show where the bell speaks.
Explain this sequence early, emphasising the need to treat the rise and pull differently. It will make it much easier to explain pulling and checking (see section 11.3h) and it may help avert the tendency many students develop of starting the pull before the rise has finished.
h: What should we teach about rope pulling?
New ringers frequently have problems and it is worth trying to anticipate them by explaining in advance.
- Pulling v checking [116]
Bell control needs a balance between pulling and checking (see section 11.3g). This means developing the ability to switch effort on or off between the rise and fall of the rope. It is much easier for the trainee to act like a spring (or a sack of potatoes) and indiscriminately apply force both on the way up and on the way down. Even when ringers have learnt to pull without checking, they still sometimes pull to try to make the bell ring more quickly (making things worse for themselves in the process).
- Feeling v pulling
The rope is the only contact between ringer and bell. It must be taut for as long as possible to feel how fast the bell is moving, and to know how much to pull. But keeping the rope too tight affects the swing of the bell. It is tempting to start pulling before the top of the swing, and not feel how far the bell could rise (especially at backstroke). This cuts the rise short and defeats the hapless student's efforts to keep the bell up.
- Matching the bell's movement
Keeping the rope taut but not too taut means raising the arms at exactly the same speed as the bell, and supporting some (but not all) of their weight. Students commonly let the full weight of their arms hang on the rope, or they lift their hands too quickly and make the rope go slack. Explain the importance of adapting to the movement of the rope in this way. See section 11.3f on practising rope tension.
- A long pull
Sustained downward tension on the rope is essential for a well behaved rope (it gives it less chance to swing sideways). It also multiplies the effectiveness of whatever force one has available (so a more gentle pull can achieve the same effect). Novice ringers tend to stop their arms part way down, wasting some of the stroke. Remind them that every stroke should finish with the hands low down (holding the tail end).
i: What should we teach about balancing?
When the bell is near the balance, it moves slowly and its weight is almost evenly balanced. In this condition it is very sensitive to how it is handled, so the ringer must be correspondingly sensitive to what the bell is doing.
Before you let students pull a bell off, put your hands over theirs and encourage them to take the weight, lift the bell off the stay, feel it get a little lighter and then return it to the stay. Have them do this several times. Teach them always to lift the bell towards the balance and pause before pulling it off. When they graduate to ringing with others, this will help them pull off into rounds much more smoothly.
j: What method should we use to teach bell handling?
We can't prescribe a single method for you. Different authorities advocate slightly different methods, all of which work. We give a broad framework (see section 11.3k & n) which covers several of the successful techniques.
Whichever method or variant you choose, use one that has been shown to work. Make sure that it suits your local conditions: the bells, your trainees and your teachers. Make sure you thoroughly understand it. If you teach ringers already, review your methods and your experience of what works well and what works less well. Think about the questions and answers in this section. If you do not teach already, read one (or more) of the books on teaching handling. [117] Consider attending a course on teaching handling [118].
When considering different teaching approaches, remember that even a good scheme will not yield good results if it is poorly or incompletely applied. Successful teaching of bell handling is as much about attention to detail and responsiveness to the needs and progress of the individual as it is about the broad sequence. All the books on teaching bell handling give lists of things to watch for, with potential faults and their correction.
Many people probably ignore much of the detail because they read (or skim) the book once and think they have it all in their heads when they haven't. Even if you have taught for some while, it is worth going back to the reference books from time to time. They all have different merits and you may find something you had forgotten.
k: Should we break things down into small steps?
Generally, yes. As an example, the table below lists a set of graded steps, each of which develops a slightly different skill. The brief descriptions in this list are intended to help you think about how to break the process into small, manageable steps whose success can be monitored as you go along. They are not complete descriptions of how to do the teaching, what problems to expect and so on. There is a lot more detail in the books on teaching bell handling (and some in this Handbook).
The sequence shown here is not the only possible one. See section 11.3n for a comparison of the similarities and differences between the main approaches
|
Activity |
Skill learnt |
| 0 |
Introduction. |
How a bell works, tying up rope, safety, etc |
| 1 |
Practise gripping the rope |
Sort out hands, fingers round rope, etc. |
| 2 |
Chime the bell while down |
Initial feel for the rope, co-ordinate pull and check to make the bell strike. |
| 3 |
'Hand ring' exercise |
Develop feel of vertical hand movement. |
| 4 |
Swing the bell part way up (from down) |
Feel more rapid rope movement with vertical pulling. |
| 5 |
Lift the bell (when up) from stay at backstroke |
Feel weight of bell, feel lightness towards the balance, introduction to 'delicate touch' |
| 6 |
Ring backstoke pull and rise |
Feel of full vertical rope movement. Learn to moderate use of force. |
| 7 |
As above but instructor varies pull at handstroke |
Learn feel of bell swinging with different energy and how to compensate. |
| 8 |
Practise hand grip and transfer exercise |
Develop hand & finger co-ordination for tidy grip & release of tail end [119] & sally. |
| 9 |
Handstroke pull only |
Learn to release grip on the way down. |
| 10 |
Ring one handstroke pull and all backstrokes |
Beginning of putting strokes together and handling sally with tail end in hand [120]. |
| 11 |
Ring handstrokes (rise and pull) with no backstrokes [121] |
Grip and release sally on the move [122]. |
| 12 |
Ring full handstrokes and backstrokes |
Final integration with continuous rise and fall rhythm and grip transfer. |
| 13 |
Lower bell (instructor handling sally and tail [123]) |
Deliberate checking, rope shortening and increasing speed. |
| 14 |
Raise bell (instructor handling sally and coils) |
Effective pulling, letting out rope, reducing speed. |
| 15 |
Coil making and releasing exercise |
Co-ordinate handling of rope and coil so it can be done without looking. |
| 16 |
Raise bell with coils |
Combine coil handling with ringing bell and letting out rope. |
| 17 |
Lower bell with coils |
As above, but making coils. |
| 18* |
Stand bell every stroke |
Develop repeatable rhythm. |
| 19* |
Ring quick hand / slow back (and vice versa) |
Switch between pull and check alternate strokes. |
*18 and 19 can come anywhere after 12.
The steps we have listed combine the best ideas of several (but not all) published schemes. Many people use fewer steps than we have shown here. There are no hard and fast rules, but in general it is better to include a step and pass through it quickly if there is no problem, than to exclude it and possibly need to pick up later a problem it could have brought out and solved.
l: How rapidly should we progress through the steps?
The list of steps above may look formidable. Since some people use only three or four steps and spend weeks on each one, you may think more steps would take a lot longer. But that is not so. The point of having many steps is that each is a small one and so easier to master. So the overall time need not get longer, and should be shorter because the student is less likely to get stuck.
The steps above are only steps along the way to ringing a bell. This is the goal. Ringing is a rhythmic process of handstroke and backstroke flowing naturally one after the other. The sooner your student undergoes this 'whole experience', the less problem you will have with him or her getting stuck [124] in the (artificial) intermediate steps. There is also much less risk of boredom (which saps motivation which in turn reduces progress).
With an average student and bells, you can get to step 12 in the first session, and probably to step 13. The skills taught at each step will not yet be fully learnt, so revise them in the next lesson. A few strokes are enough for things remembered well, and a little longer for any step which shows problems. After the first couple of lessons, you will drop the earlier steps, but always be prepared to go back to one of them if you detect a problem. For example if your student starts throwing the rope, go back to the hand ring exercise on a dead rope.
m: Should we teach everyone the same way?
People vary in their abilities and their learning style. Some learn more rapidly than others. Some learn best by just 'doing' while others tend to reason about what they are doing. Different people find different things difficult and people sometimes have setbacks in their progress. You must adapt your teaching to the needs and progress of the individual. Have a well thought out approach which you use as a baseline, but monitor progress carefully and be prepared to slow down, go back or divert if your trainee has problems (and conversely to push on if he or she is doing really well).
n: Is it better to teach starting 'bell up' or 'bell down'?
This distinction is a gross over simplification. If all you care about is what the first step is, you are not thinking about the whole process. The sequence of steps in section 11.3k actually starts by ringing the bell while it is down, but many would recognise steps 5 - 12 as the core of teaching 'bell up'. There are different ways of mixing 'bell down' and 'bell up' exercises.
The diagram below combines five main approaches to teaching bell handling, so you can see how they differ and where they overlap. At the left are two 'bell down' methods (a) (b), in the centre two 'bell up' methods (c) (d) and on the right a hybrid method (e), with dead-rope exercises in suitable places.
In the diagram hollow arrows just show what follows what, but solid arrows indicate a continuous, non-stop exercise. The dashed line shows where the hybrid method has the option for following (a) or (b) instead of (c) or (d).
This is only a simplified diagram. We can't get all the detail on one page. Look at the source references [125] to understand them more fully.
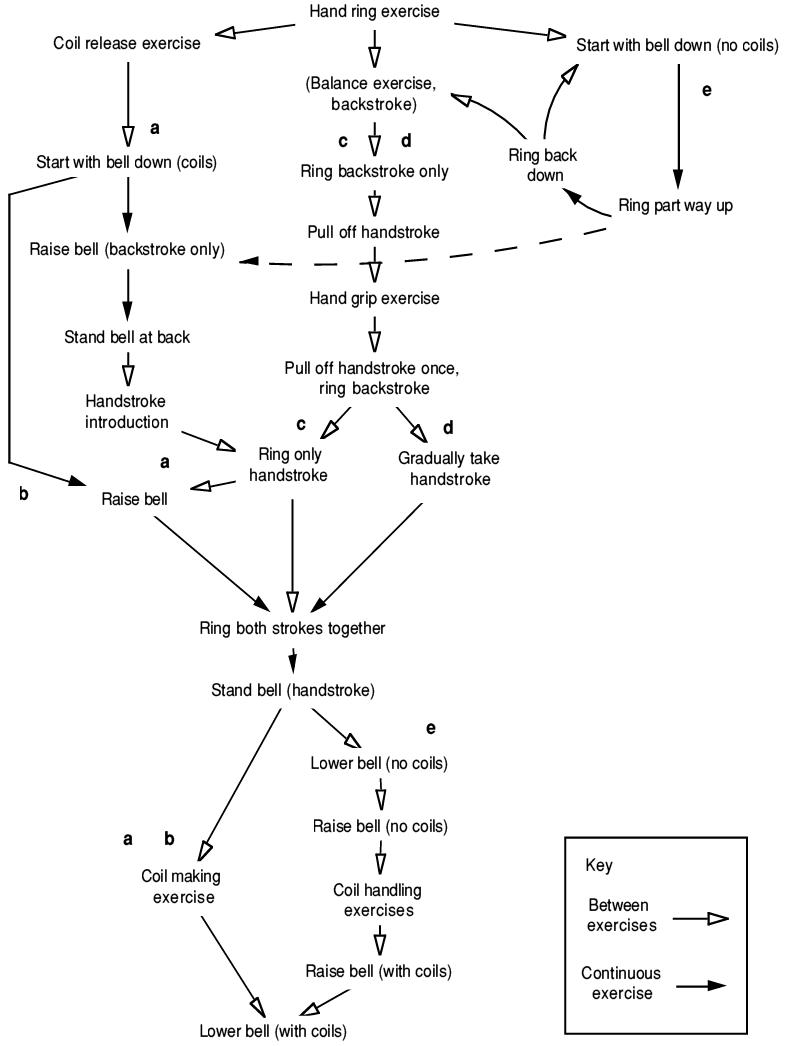
The main case for starting with a bell down is that it allows the trainee to develop a feel for the bell in a safe condition. (This is important if you are a slightly built instructor with a burly pupil.) Apart from this, having your pupil raise the bell (even if only half way up) means that he or she must develop at least some differentiation between pulling and checking, and must adjust the rope length. Both of these are important 'automatic reactions' that do not always develop when starting 'bell up'. The hybrid method (e) merely adds this benefit onto the front of what is otherwise a 'bell up' approach.
If you start like this, you can make the choice about how to proceed depending on how you pupil is faring. If he or she is having any difficulty [126], you should continue with the sequence described in section 11.3k. But if there are no problems, then you could continue with (a) or (b). (a) is a more measured approach while (b) is an accelerated approach not suitable for all ringers or all bells, but it works for some. (a) and especially (b) make greater initial demands on the pupil but build a more complete set of skills quickly.
The case for starting with the bell up is that it requires less physical effort and less co-ordination from the pupil in the early stages. The instructor has effective control over the bell for the early stages. This ensures safety (despite the bell being in a more intrinsically dangerous state) but also reduces the feedback to the pupil of the effects of his actions. All the arm actions are slower (especially with the bell well up to the balance).
o: Should I pull the rope as well as the student?
You may have read this question twice and thought it ambiguous. Does it mean you and the student both pulling the rope or you pulling both the rope and the student? If you think about it the two are not so different. Whenever you pull the rope you also affect what the student feels and therefore does. It is very easy to find that you, and not the student, are really ringing the bell. And you are in effect ringing the student as well.
There will be occasions when you feel you must intervene in the interests of safety. But try to do it as little as possible. Every time you do, you break the link between what the student feels and does. This is one of the reasons why you should try to progress to two stroke ringing as quickly as possible, since ringing one stroke each, you do a lot of the control.
p: How can I be sure the student won't do any harm?
Harm to the bell should not be a problem when you are ringing one stroke. If you limit the pull it will not have the energy to break a stay. If your trainee over-pulls, you should be able to absorb the energy before the next stroke.
When the student is ringing both strokes, then you rely on having already developed a degree of moderation, coupled with your ability to spot any trouble in time to intervene if needed. This step is safest when you have done the preliminaries thoroughly to develop a good feel for 'how much pull is needed'.
Harm to the ringer is less simple. The risks come mainly from hanging on at the wrong time (rope burns or injured fingers) and reaching backwards at backstroke (rope descending on shoulders). These are rare events. Prevention is better than cure, and if you teach the preliminaries well, they should remain rare events, but you must still be prepared, just in case. The best cure for grabbing the rope at the wrong time is a stern 'Let go!', possibly accompanied by knocking the pupil's hands down. The only cure for rope falling on the shoulders is to lift it off quickly.
q: If I pull, should I pull under or over the trainee's hands?
The ideal is to put your hands below rather than above the trainee's. This is called under catching. It allows the trainee to feel more of what the bell is doing, rather than what you are doing, but it does have disadvantages. Many people find it harder to get hold of the rope underneath the trainee's hands without causing disruption.
But in an emergency you should do whatever you need to exert the required action quickly. If you have been standing back hands-off, this will probably mean taking the rope above the trainee's hands (well clear of them).
r: If the student gets into difficulties should I take the bell over?
There will always be some cases where you must, but the reason for teaching the drill in section 11.3d is so your pupil can survive mishaps safely. If you take over too soon, you will reinforce the idea that the pupil can't control the situation. Remind the pupil, firmly, what to do [127]. In most cases this encouragement will work and the pupil will regain control. The satisfaction of solving the problem will offset the upset of having caused it in the first place. Only take over the bell if it could be dangerous not to do so.
s: What is sweeping?
It lets you intervene to encourage a long stroke, with minimum disruption. Place your hand above (or sometimes below) the student's wrists, in contact but not holding anything. Gently but firmly sweep the trainee's hands down ahead of yours to keep them moving. Do this if your students hands tend to move too slowly or not far enough down from the pull. You should not need to apply great force. The mere contact with your hands will often be enough.
t: Can you teach on heavy or very light bells?
Yes, but it is harder than on middle to lightweight bells.
- Heavy bells
It may not be possible for all people. Lightly built people may have difficulty pulling adequately. Heavily built people may get such a purchase that the tutor has difficulty absorbing any excess.
- Light bells
Some people may have considerable difficulty before they develop a sense of delicacy in their handling, because the rope movement is rapid and it is easy to disrupt the movement of the bell.
u: Should we expect to break stays when teaching students?
No. It may happen occasionally, but if stays break often, there is either something wrong with your stays (see section 14.5) or with your teaching. All learners occasionally bang the stay, but they should not do so regularly. If they do, tackle the problem urgently, since your student has inadequate control over what the bell is doing at handstroke [128]. Occasional bumps are harder to spot [129], but as instructor you should either make sure that the bell is being rung within safe bounds, or that you can intervene if necessary (eg to absorb some of the energy at handstroke after an excessive pull at backstroke). By watching closely, you should always be aware of whether the student is pulling strongly enough to cause damage if he or she fails to stop the sally.
v: Should we silence the bells for initial teaching?
You don't need any sound to teach someone to handle a bell, but teaching bell handling is only a step on the way to full ringing where the ability to hear one's bell is essential to good striking. In view of the difficulty some people have adding the listening skill on later, you should if at all possible find a way to allow trainees to experience from the start the sound of the bell as an integral part of ringing it. In most situations, the sound of a single bell donging outside the tower is undesirable, so you ought to find some way of reducing or eliminating it. See section 6.4i.
w: What handling problems should I watch for?
People develop many little (and some big) faults in their bell handling. The specialist books list in detail the faults that cause such problems. (The Tutor's Handbook lists 41). Here we list a dozen general problems.
| Problem |
Possible cause |
Try saying... |
| Over pulling |
Over enthusiasm,
'Fighting the bell' |
Don't pull so hard.
Try to check without pulling. |
| Rope Throwing |
Stiff arms,
Poor stance,
Fear of the rope |
[Use the hand ring exercise]
Stand further back (forward).
[use a 'docile' bell] |
| Continual dropping |
Rope too short
Failure to let the bell rise before pulling
Too short a pull |
Let out a little rope.
Let it rise before you pull.
Try to feel the top of the stroke.
Pull all the way down. |
| Imbalance between handstroke and backstroke |
Wrong rope length plus compensation at the other stroke |
Let out (take in) a little rope.
Let the backstroke (handstroke) rise and quicken the handstroke (backstroke). |
| Stay banging |
Hands too low on sally,
Passive handstroke,
Pulling too hard at back |
Bring your hands up sooner.
'Ring' the handstroke, don't let it ring you.
Don't pull so hard at back. |
| Short strokes |
Hands not going down fully,
Hands not rising to full stretch. |
Take your hands right down.
Shorten your rope. |
| Sally snatching |
Hands waiting at waist level,
Hands rising too quickly. |
Take your hands right down.
Bring your hands up with the same rhythm as the backstroke. |
| Problem |
Possible cause |
Try saying... |
| Hand sliding |
Hands rising to sally too soon,
Habit |
As above,
[Try not to let it develop] |
| Wrong grip |
Fear of losing the tail end |
All fingers round the sally.
[exercises with dead rope] |
| Rope Climbing [130] |
Fear of the bell going too far,
Over pulling |
Let out a little rope and don't pull so hard. |
| Slipping down the tail end |
Pulling too hard |
Don't pull so hard + shorten your rope. |
| Combination of above two |
Each attempting to correct the other, not fully aware of rope length control. |
Don't keep taking in rope.
Your rope length is OK. |
Many of these create vicious circles. They cause the effect the student is trying to overcome. For example:
- Throwing the rope away from you causes it to swing back into your face, making you feel the need to throw it away more.
- Snatching at the rope in your eagerness to pull hard causes it to drop, so you feel the need to pull it even harder.
x: How should I correct faults?
You can't correct faults. You can detect them, draw attention to them, explain why they occur and demonstrate how to do things, but only your pupil can correct them. You may try to force correct behaviour during an exercise, but it may not work [131], or it may not transfer to normal ringing afterwards.
y: When is bell handling teaching complete?
When your pupil can do all the things listed as 'yardsticks' below (see section 11.3z). This will be a long time after the end of basic bell handling tuition. Your style of teaching must change, but it should not stop. Think of 'tuition' followed by 'coaching'. Coaching will become less intensive as the fledgling ringer becomes more proficient. After a while, all you need is to keep an eye on his or her progress, giving occasional advice when needed, and perhaps the odd prompt, eg 'Try the 5th. It's the worst bell in this tower, see how well you can strike it'.
z: What yardsticks should we judge bell control against?
There is always some subjective element in deciding whether someone can or can't satisfactorily do something, but you can be more objective if you consider achieving specific objectives. These yardsticks should help you to be more objective:
- Able to ring a bell safely without close supervision
- Able to ring reliably at a constant speed
- Able to ring at different speeds on demand
- Able to make the bell speed match an external rhythm
- Able to do the above accurately
- Able to do the above with a heavy or light bell
- Able to do the above with an unfamiliar bell or difficult rope
- Able to compensate for an odd struck bell
- Able to dodge
- Able to ring steadily when surrounding bells are not
- Able to do the above while concentrating on a method
- Able to make the best of a badly going bell.
You may find these descriptions a little abstract compared with 'ring rounds', 'lead', 'cover', etc. This is deliberate to encourage you to look more critically at the developing skills of your pupils. A task like leading uses several of the above skills (but in favourable circumstances it is possible to get away with some passable leading while not fully having mastered them). As a teacher you will naturally try to give your pupil easy situations in which to perform well, but in assessing progress you should be looking for ability to perform well in less than ideal conditions too.
Previous

 Next
Next
Currently hosted on jaharrison.me.uk